Creating a Library Management System (LMS) using Python and Django can be a rewarding project. Django is a powerful web framework for building web applications quickly and efficiently. Below, I’ll outline the steps to get you started on this project:

Prerequisites:
To build this project, user must know how to create project and application using Django framework
Table of Contents
- Prerequisites:
- Features of library management system:
- Defining Models:
- Defining Views:
- Getting Project and Application
- Enhancing the applications
Features of library management system:
Following are the main features we intend to build in our LMS
- Add, view, and delete books
- Issue and return books
- Add, view and edit Authors
- Add, view and edit Users
Defining Models:
Before starting the Django project and application, let’s define the data model which shall provide the entities for the application:
Author :
- first_name
- last_name
Book:
- title: Title of the Book
- author: Author of the book
- category: Category of the book e.g. ‘Biography’, ‘Science’, ‘Education’, etc..
- status: Current status of the book = ‘available’ or ‘issued’
- issued_to: name of the user
Transactions
- Book: Name of the book
- type: trnsaction type = ‘issued’ or ‘returned’
- user: name of the user
- updated_by: Name of the Administrator performed the transaction
- date: date of transaction
- comment: comment text
User
We shall use Django’s in built User model for the authentication, administration and user list. For more details: How to use Django User object
The primary attributes of the default user are:
- username
- password
- first_name
- last_name
- is_staff
Following is the relationship diagram of the Data Model:
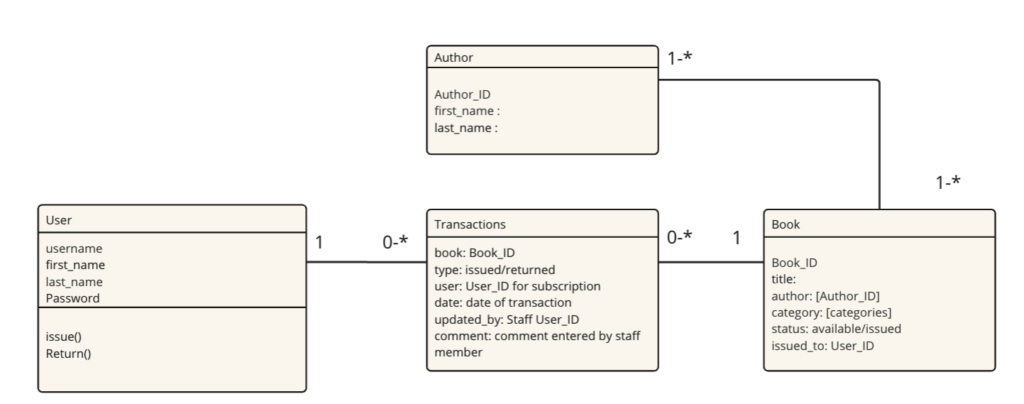
Book and Author objects have many to many relation i.e. a book can be written by multiple authors, similarly an author can be associated with multiple books. A transaction must be associated with only one book and one user only. A book can be linked with multiple transactions over the period ( issued or returned). A user can get issued multiple books so may be associated with multiple transactions and therefore multiple books.
Defining Views:
Login Page: For Login/Register users
Books: Home page to display the list of the books . Staff user can issue/return books on this page
Authors: Displays list of authors and their books
Transactions: Available only for Staff user to display list of transactions
User: Available only for the Staff user to display list of users
Getting Project and Application
To build rich user interface for the application a UI kit : sample-django-datatables shall be used. This UI kit provide ready to use component . On top of the UI kit , we shall create our library management system application.
Get the code
git clone https://github.com/CodeBlockHub/CodeBlockHub.git
cd Python/projects/django-library-mgmt-system
Create Virtual environment
# Virtualenv modules installation (mac based systems)
python3 -m venv env
source env/bin/activate
# Virtualenv modules installation (windows based systems)
python3 -m venv env
.\env\Scripts\activate
Install required python modules
pip3 install -r requirements.txtCode-base Structure
The project has following simple and intuitive structure presented bellow:
django-library-mgmt-system
   |
   |-- core/                               # UI Kit framework applications
   |
   |-- authentication/                     # Handles auth routes (login and register)
   |    |
   |    |-- urls.py                        # Define authentication routes
   |    |-- views.py                       # Handles login and registration
   |    |-- forms.py                       # Define auth forms
   |
   |-- db-lms.sqlite3                     # database contaning books, author, sample users
   |
   |-- app/                                # A simple app that serve HTML files
   |    |-- admin.py                       # amin page for app
   |    |-- forms.py
   |    |-- models.py                      # models used in the lms application
   |    |-- views.py                       # Serve HTML pages for authenticated users
   |    |-- views.py                       # Serve HTML pages for authenticated users
   |    |-- urls.py                        # Define some super simple routes
   |    |-- templates
   |        |-- app
               |-- author_form.html        # form to create new author (for admin)
               |-- author_list.html        # author list
               |-- book_form.html          # form to create new book (for admin)
               |-- book_list.html          # list of books
               |-- book_request.html       # book issue/return form (for admin)
               |-- transactions_list.html  # transactions list  (for admin)
            |-- auth
               |-- user_list.html          # user list  (for admin)
   |
   |-- requirements.txt                    # Development modules
   |
   |-- .env                                # Inject Configuration via Environment
   |-- manage.py                           # Start the app - Django default start script
   |
   |-- ************************************************************************
Create Data Tables:
‘app’ is using sqlite database. In the repository a pre-filled database ‘library-mgmt-system\db-lms.sqlite3’ is already available. To create all migrations and setup the applications run following commands ( If you want to start with a blank database then remove database ‘django-library-mgmt-system\db-lms.sqlite3’)
# moveinside the project folder
cd django-library-mgmt-system
# Create tables
python manage.py makemigrations
python manage.py migrate
Create Superuser
Create a super user for the administration of the application. This is the standard superuser object used in Django application
# Create app superuser
python manage.py createsuperuser
Start the application
# Start the application (development mode)
python manage.py runserver # default port 8000
# Start the app - custom port
python manage.py runserver 0.0.0.0:<your_port>
# Access the web app in browser: http://127.0.0.1:8000/
Once the application is successfully launched access the web app in browser: http://127.0.0.1:8000/. A login screen shall appear. You can login with superuser credentials or register as a new user as shown below:
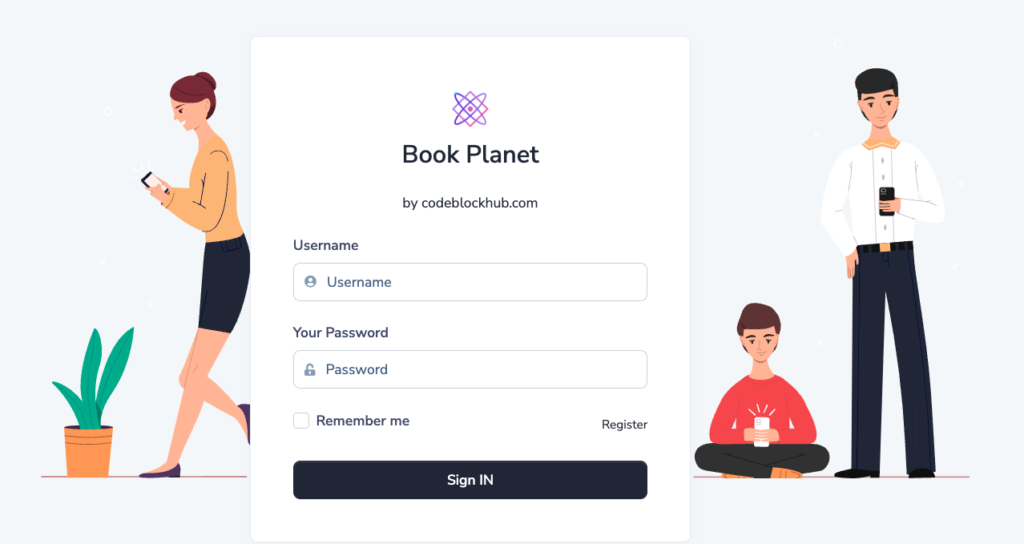
Books View
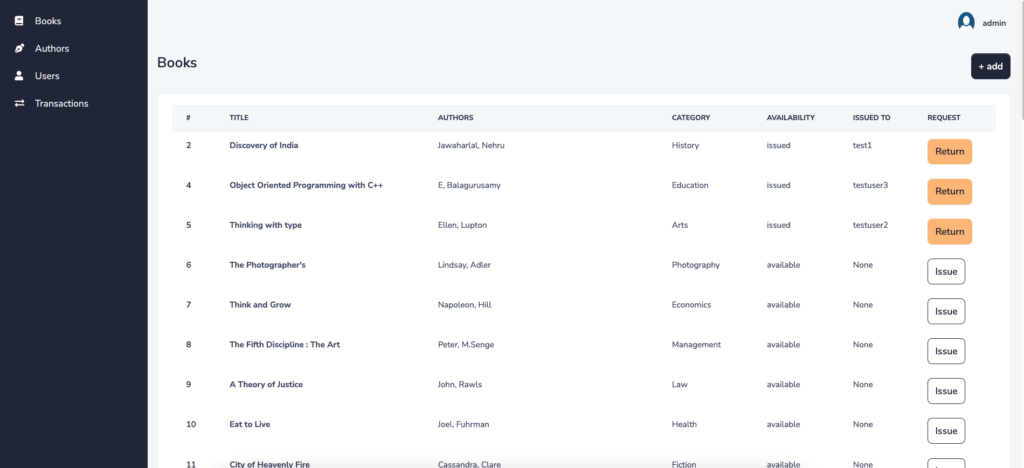
On successful login, home page will be displayed. Home page is the list of books available in the library. Following image shows the “Books” view for the administrator. On this page administrator( staff user) can issue or return the book for the users. A normal user will not be be shown “Request” column
Author View: Administrator can view/add authors

Users View ( Only for administrators)

Transactions View( Only for administrators)

Admin Panel
You can always use Django’s default in-build admin panel by using web url : http://127.0.0.1:8000/admin/
Login using superuser credentials created earlier:

Enhancing the applications
You can enhance the applications by adding more features, models, views
1. Add Data Models:
Add new data tables in file: django-library-mgmt-system/app/models.py
# -*- encoding: utf-8 -*-
from django.db import models
from django.contrib.auth.models import User
from django.utils import timezone

class Author(models.Model):

    first_name = models.CharField(max_length=200)
    last_name = models.CharField(unique=True, max_length=200)

    def clean(self):
        self.last_name = str.lower(self.last_name)
        return super().clean()

    def __str__(self):
        return f"{self.first_name}, {self.last_name}"


class Book(models.Model):
    categories_list = [("Biography", "Biography"),
                       ("History", "History"), ("Autobiography", "Autobiography"),   ("Education","Education"), ("Arts","Arts"), ("Photography","Photography"),
                  ("Economics","Economics"), ("Management","Management"),("Law","Law"),("Health","Health"),("Fiction","Fiction"),
                 ("Business","Business"),("Fantasy" ,"Fantasy"),("Space","Space"),("Philosophy","Philosophy")]


    book_status_type = [("available", "available"), ("issued", "issued")]
    title = models.CharField(max_length=300)
    author = models.ManyToManyField(Author, blank=True)
    category = models.CharField(choices=categories_list, default="Fiction", max_length=200)
    status = models.CharField(choices = book_status_type, max_length=200, default="available")
    issued_to = models.CharField(null=True,default=None, max_length=200)
    # requested_by = models.CharField(null=True, default=None, max_length=200)

    def __str__(self):
            return self.title


class Transactions(models.Model):
    transaction_types = [("issued","issued"), ("returned","returned")]
    book = models.ForeignKey(Book,on_delete=models.PROTECT)
    type = models.CharField(choices=transaction_types,max_length=200, null=True)
    user = models.ForeignKey(User, on_delete=models.PROTECT)
    updated_by = models.CharField(max_length=200, null=True)
    date = models.DateField(default=timezone.now)
    comment = models.TextField(max_length=400, default="")

    def __str__(self):
        return self.status
2. Define URLs
Define URL patterns in django-library-mgmt-system/app/urls.py to map URLs to views.
from django.urls import path, re_path
from app import views
from .views import BookListView, AuthorListView,  TransactionsListView, UserListView

urlpatterns = [

    path("", views.home, name="home"),
    path("transactions/", TransactionsListView.as_view(), name="transactions-list"),
    path("book/", BookListView.as_view(), name="book-list"),
    path("user/", UserListView.as_view(), name="user-list"),
    path("author/", AuthorListView.as_view(), name="author-list"),

    path("author_form_view/", views.author_form_view, name="author-form"),
    path("book_form_view/", views.book_form_view, name="book-form"),
    path("book/book-request/<id>/<req_type>/", views.book_request, name='book-request'),

    # Matches any html file
    re_path(r'^.*\.*', views.pages, name='pages'),

]
3. Create Views
Create views to handle various actions such as adding books, listing books, borrowing books, etc. Use Django’s class-based views for better organization and reusability.
To edit/create views use file: django-library-mgmt-system/app/views.py
4. Implement Templates
Create HTML templates to render user interfaces. You can use Django’s template language to inject dynamic content.
5. Implement Business Logic
Write Python functions or methods to implement the business logic of your library management system, such as borrowing books, returning books, calculating fines, etc.
6. Implement User Authentication (Optional)
In the application, If you want to enhance user management system, you can use Django’s built-in authentication system.
7. Test and Debug
Test your application thoroughly to ensure all functionalities work as expected. Debug any issues that arise during testing.
8. Deploy (Optional)
Once your library management system is ready, you can deploy it to a web server to make it accessible to users.
Remember to follow best practices such as using version control (e.g., Git), writing clean and modular code, and documenting your project. Django’s official documentation is an excellent resource for learning more about Django and its features. Good luck with your project!

