Objective
To develop a GUI-based expense tracker application with python to record and categorize daily expenses, storing the data in an SQLite database.
An expense tracker application with python is a useful tool that allows you to record and categorize your daily expenses in a convenient and organized manner. It provides a user-friendly interface for entering and managing your expenses, making it easier to track your spending habits and financial goals.
Table of Contents
Table of Contents
- Objective
- Table of Contents
- Requirements
- Packages Needed
- Steps
- Start Application
- Sample Output
- Source Code
- Conclusion
Requirements
- Intermediate level understanding of Python
- Basic knowledge of SQL and databases
- Familiarity with Tkinter for GUI
- Python 3.x installed
Packages Needed
Steps
Following are the steps for creating an expense tracker application with Python:
Step 1: Initialize SQLite Database in Python
Create a project folder named “expense-tracker” and create a python file “expense-tracker.py” inside the folder
Import Tkinter and sqlite3 and create a new SQLite database named expenses.db and for storing expenses.
#expense-tracker/expense-tracker.py
import tkinter as tk
from tkinter import ttk
import sqlite3

conn = sqlite3.connect('expenses.db')
If you run this file now then you should have following structure:
- expense-tracker
- expense-tracker.py
- expenses.db
Step 2: Create data table in Python
Check if table ‘expenses’ exists in the database else create the data table with the columns id, category and date
cursor = conn.cursor()
res = cursor.execute("SELECT name FROM sqlite_master WHERE name='expenses'")
if res.fetchone() is None:
  cursor.execute(
    '''CREATE TABLE expenses (id INTEGER PRIMARY KEY,
    category TEXT,  amount REAL,
    date TEXT)'''
    )
Step 3: Create GUI Layout
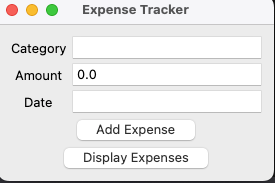
Create the basic Tkinter layout with entry fields for category, amount, and date.
window = tk.Tk()
window.title("Expense Tracker")

frame = ttk.Frame(window, padding="10")
frame.grid(row=0, column=0, sticky=(tk.W, tk.E, tk.N, tk.S))

tk.Label(frame, text="Category").grid(row=0, column=0)
tk.Label(frame, text="Amount").grid(row=1, column=0)
tk.Label(frame, text="Date").grid(row=2, column=0)

category = tk.StringVar()
amount = tk.DoubleVar()
date = tk.StringVar()

category_entry = ttk.Entry(frame, textvariable=category)
amount_entry = ttk.Entry(frame, textvariable=amount)
date_entry = ttk.Entry(frame, textvariable=date)

category_entry.grid(row=0, column=1)
amount_entry.grid(row=1, column=1)
date_entry.grid(row=2, column=1)
Step 4: Add Functionality
Add the function to add an expense to the database.
def add_expense():
    cursor.execute("INSERT INTO expenses (category, amount, date) VALUES (?, ?, ?)",
                   (category.get(), amount.get(), date.get()))
    conn.commit()

add_button = ttk.Button(frame, text="Add Expense", command=add_expense)
add_button.grid(row=3, columnspan=2)
Step 5: Display Expenses
Create a function to display the expenses. It includes a query to fetch the expenses from the table and display on the console.
def display_expenses():
    cursor.execute("SELECT * FROM expenses")
    expenses = cursor.fetchall()
    for expense in expenses:
        print(f"ID: {expense[0]}, Category: {expense[1]}, Amount: {expense[2]}, Date: {expense[3]}")

display_button = ttk.Button(frame, text="Display Expenses", command=display_expenses)
display_button.grid(row=4, columnspan=2)
Step 6: Main Loop
Add the Tkinter main loop to start the application.
window.mainloop()Step 7: Combine Everything
Combine all the pieces into a single script, and make sure to close the database connection when the application is closed.
def on_closing():
    conn.close()
    window.destroy()

window.protocol("WM_DELETE_WINDOW", on_closing)
Start Application
Launch the application from the terminal or using any code editor e.g. VS Code:
python expense-tracker.py
Sample Output
After running the application, a GUI window will open. You can enter your expenses and then view them by clicking the “Display Expenses” button. The expense data will be stored in the SQLite database.

Source Code
You can download the complete working code from here
Conclusion
Congratulations, you’ve built a functional Expense Tracker with a graphical user interface! You can expand it further by adding features like expense categories, monthly summaries, or even graphical analytics.


